
In today’s photography, processing images on the computer has brought us the responsibility of learning new methods to control color and tone from the older ways of the cc filter, control strips, densitometer readings, etc. Digital Imaging is here to stay, along with the evolution of the methods we use to control color management. We can either except the new ways of imaging or find ourselves extinct like the dinosaurs of a time long ago. My first experience with most studios is teaching or instructing them the ways of monitor calibration and, in turn, color correction. Once a monitor is calibrated properly to your lab or largest output source, your battle with this technology is well on the way to understanding the process of digital workflow.
It Starts with the Monitor...
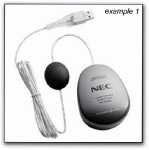
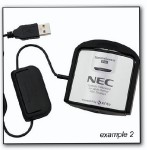
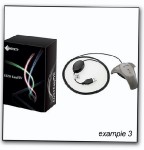
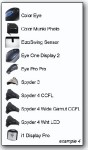
Like with all things, the process needs a beginning, for me, this process begins with the selection of a monitor. While many of you will find yourself purchasing the least expensive or middle market priced monitor, or maybe one that looks great in the store with that high definition screen that your photography just looks awesome on, consider the following, “Your monitor is to your computer as the lens is too your camera”. In simple terms, your camera is just a black box which excepts the final image, just like the computer, but the lens is the quality of that image. If you think about it in those terms, your monitor gains a lot more respect and importance in the entire process. Most of us wouldn’t go out and find the most expensive camera and attach a $50 lens on it, so why is it that many studios do this with computer monitors? I could write an entire book on the in’s and out’s of computer monitors, but the long and short of it is, do your research. For example: If your working in an RGB workspace, your monitor needs to handle an RGB workspace, but you will be amazed to find out that almost 90% of the worlds monitors made are only sRGB monitors, again, we must be diligent in doing the research. I have my favorite brands, I won’t list them here, but with calibration many of them have their own proprietary software that work with all or most of the calibration devices that are available in the marketplace although each of those companies like to sell their own versions of the colorimeters for additional costs to increase profit margins, but they are devices that are made for them by manufacturers of calibration devices like Xrite.(see examples 1,2 and 3). It’s important to understand that although the software MUST be used to take full advantage of all the qualities of that specific monitor, the device you use is up to you. For the rest of the monitors that are available, the software that is included with your colorimeters will do a wonderful job, like the devices that are listed here in example 4
Are you viewing accurate color on your display?
Have you ever wondered why the colors you see on your monitor don't match the photograph you are viewing or the image you printed? That’s because what you see on-screen is only as accurate as your display. Displays all vary just in their "out-of-box" settings. And, over time, the color performance of monitors change – phosphors and LCD filters begin to fade, so your display starts to drift into unknown colors. Fortunately, there's an easy way to fix this. Calibrating and profiling will optimize your monitor's settings for contrast, brightness, and color temperature, and allow you to see your "true colors." Studios and photographers who need accurate colors may benefit from many different types of printer or camera calibration, but as a minimum a color-calibrated monitor is a MUST. Whether viewing or outputting, seeing accurate color eliminates the trial-and-error process and creates a time benefit for you.
How it Works
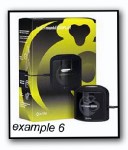
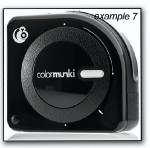
All studios and photographers can benefit from a profiled monitor without spending a lot of time or money. Simply plug in the color measurement device (like the ones seen in example 4) and use it to read the color values of your monitor. The wizard-based program will use this information to calibrate your monitor and bring it back to a known standard of performance for contrast and color balance, much like a tune-up is too your vehicle. It will then create specific information that describes your monitor, and automatically saves it to the computer. Today’s market has so many devices,but the ones I prefer are those that are multitasking, like the i1 Display Pro (example 5) and Color Munki Display (example 6). They not only calibrate monitors, but your projectors as well. So when you arrive in your sales appointments, your color is just as accurate on your screen as it is on your display. There are other devices like the Color Munki Photo (example 7) which not only does the monitor and projector, but also creates profiles for your printing needs, very cool stuff! If precise color matching is critical to your work, you can opt for the more advanced features, these and many other features are available in many of the solutions found in many of the manufacturers colorimeters and spectrometers. Consider the following to get an idea of what features you might be looking for in your calibration device.
• To ensure you are viewing your prints in the same light, select a color measurement device with an ambient light head to measure the light around the monitor.
• If you need all of the monitors in your studio to display the same brightness, you may find the ability to set monitor luminance valuable.
• Having the white on your monitor match the paper you print on may be useful, so you'll want a program that offers the ability to set a paper white point.
• Images displayed on multiple calibrated monitors will look more or less the same, but may vary slightly if the monitors have a different color gamut. Network monitor calibration lets you pick one monitor as the studio "standard," save the calibration values, and use these values as a standard for the other monitors; ensuring closer matching on multiple machines.
Monitor calibration and profiling will provide the best image reproduction on-screen, so your digital photos replicate the scene you remember, game graphics show the intense edge you're after, and Web-browsing delivers colors you can trust. Whether you're a photo enthusiast or full time professional.

How often will I use it?
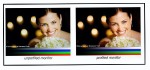
Professional Photographers calibrate at least once a month and before any major cash generating job. The average home use will find that every 4 to 8 weeks is sufficient (varies depending on the age and quality of the monitor). The process takes less than 10 minutes. Basically, monitors (both LCDs and CRTs) drift over time. CRT’s haven’t been made for some time, so you still find yourself using these monitors in service, you will either be calibrating much more often or finding a replacement soon. If you do find that you are doing this process every few days to any display, it’s time to retire that display as soon as possible, time is money! You should let the monitor warm up for half an hour before calibration, as there are usually big color changes in the first few minutes of using a monitor. If your monitor is older or brand new, then calibration will need to be done more frequently. From the above example, you can truly see the color, brightness and gamma difference of a display that is profiled and one that isn’t. Be diligent in this process folks, it will not only save you time, but money from the labs, as they do have different pricing if they are doing the color correction. Of course, in the long run, time it the most valuable resource we have.

![]()