
In the last issue, I went over the in’s and out’s of purchasing monitors and calibration devices to establish proper color balance on your monitors. In this next series (part two), I will look at taking the next step on how to reduce your image processing time and improve quality control in your Raw workflow by combining the powerful color capabilities of the ColorChecker Passport.
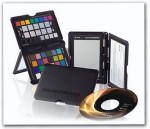
This device allows you to quickly and easily capture accurate color, instantly enhance portraits and landscapes, and maintain color control and consistency from capture to edit. Folks, I can promise that I can get you 90% color corrected by the click of a button, but as I say with all my other students, “The last 10% is all up to you to screw up!" There are so many ways to incorporate X-Rite ColorChecker Passport into your Raw workflow. Whether you take advantage of the entire solution, or just a couple of the ColorChecker Passport's many features, you'll realize improved quality and productivity almost immediately.
The really beautiful feature about the process I am about to demonstrate to you is that it will work with what type of lights your working under in your studio, workflow stage and whatever monitor you are using, if you trust that your monitor is calibrated properly with your lab, your adjustments almost become obsolete. Let’s take a look shall we?
Using the Light Meter...
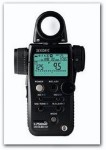
My first job is to use a light meter to establish proper exposure. I do know how popular it is these days to use the Histogram on the back of your camera’s, or the viewfinder for that matter and I could write a whole article on why that’s not really a good idea, but when you come from the world of photographing transparency film for a living, you would know why, I feel, the light meter is one of today’s most useful devices. The wonderful thing about today’s meters is that they are digital themselves and can be programmed for your digital camera equipment. I am very excited about the Sekonic line of meters and am using the L-758DR programmable meter, it's just a wonderful piece of equipment that can program up to three camera inside the same meter, wow!
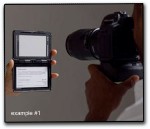
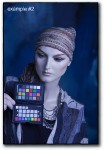
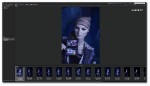
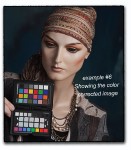
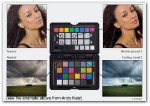
Once I have established my exposure, my next task is to photograph the ColorChecker Passport in the area I am currently shooting in, using it as a control strip (using a term for us older photographers). Let me first let you know that although you can use this device as a way to determine custom color balance (as shown in example #1), I feel that is to slow and gets in the way of working quickly with the client. I use a “preset” on the camera, with my normal setting as “shade”, but for the demonstration in this exercise, I am using the tungsten setting to show how “cool” this device really is! (This is the reason for the blue in example #2). I find a lot of photographers are setting their cameras on “Auto”, this is not a setting I would ever photograph with. I feel it just causes me more grief than I would like with my the workflow process.
The Project Workflow...
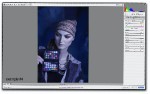
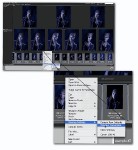
As you can see from example #3, I have opened up my project in Adobe Bridge to take a look at my images under my color calibrated monitor. From here, image number one below is the image from example #2 that I will open inside Adobe Camera Raw for processing. (For Mac users your shortcut to open straight into Camera Raw is Command R, for PCer’s Ctrl R, see example #4 for your Adobe Camera Raw view).
Camera Raw...
So, here we are in Adobe Camera Raw Processing area. The only difference between example #4 and example #5 is that we took the White Balance Tool shortcut (I) and clicked on the third gray box on the top of the ColorChecker Passport to color correct the image by just the click of a button folks. Now, if you trust that monitor that has been calibrated, your work is almost done, but as always, there is always something that can be added, so here it is...”The Creative Enhancement Control”.
Creative Enhancement Target...
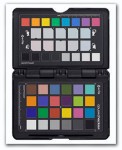
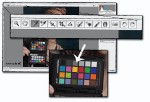
Now, before you move on and process (and this is where that last 10% comes in folks), one of the really “cool” features is the all-new Enhancement Target. It provides a higher level of color creativity and control to your workflow. The Enhancement target includes four rows of color patches designed for image editing with just the click of an eyedropper. Whether it’s a studio shot, a colorful landscape or a multiple scene photo event, you can extend the power of your photo editing software in virtually any Raw processing software.
Two rows of warming and cooling patches in the middle guide you to create pleasing and repeatable edits. Creatively refine the color of your image by adding warmth to skin tones or boost the deep greens or blues in a landscape. Simply click through the patches to view the adjustment, and select the one that provides your optimal look. Then, save the setting and apply it to other images that were shot under that same lighting to create pleasing edits – it’s that easy!
Finishing Up!...
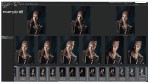
All we need to do from here is place the new color setting on the rest of the images in Bridge select the images you want to drop your color on by right clicking (for the PCer’s or Control clicking for us Mac Users), move to “Develop Settings, Previous Conversion and let go. All of your images will have the color information dropped on and you are ready for processing by send then process through the image processor. (See Examples #7 and #8).
From time to time, I find myself using the full potential of the included software to run a complete color profile that is included with the ColorChecker Passport, but more times than not, it's a very slow process that isn't fully necessary to get great color. It's something that you will need to figure out in your own workflow, but it's nice to have the options. Good color to all, and as always, any questions are welcome.